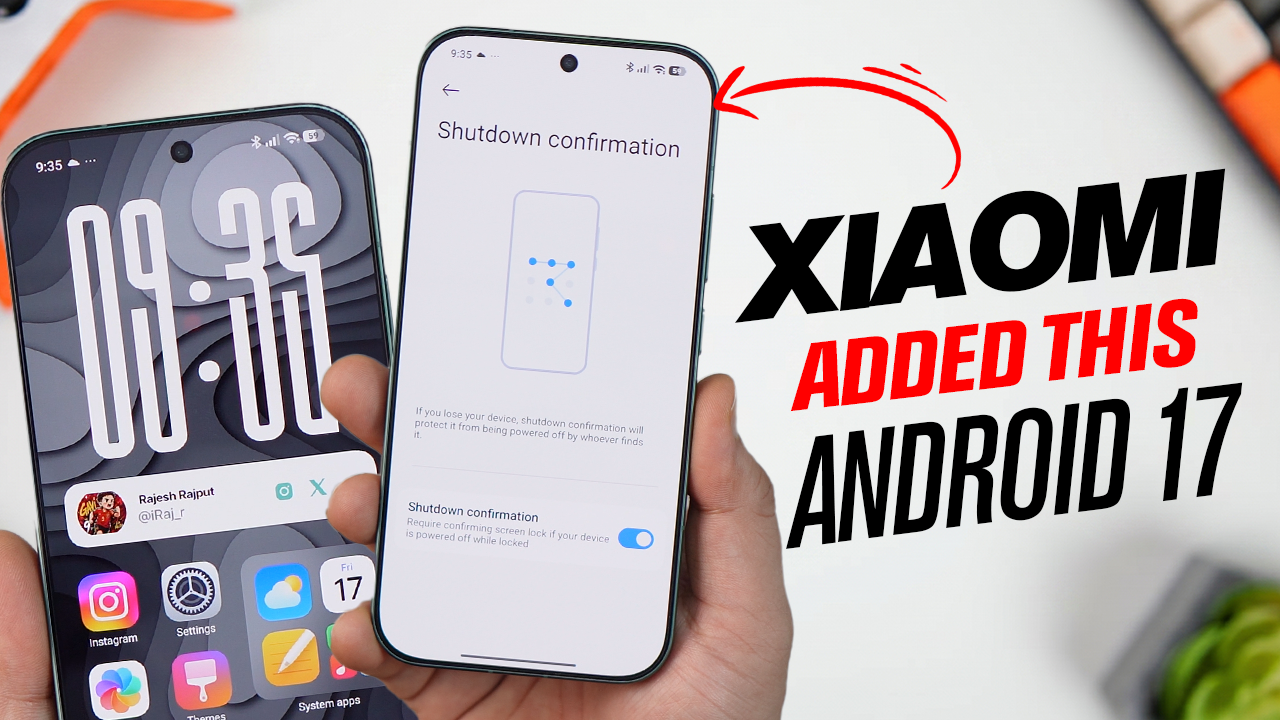
How to create expandable post summaries in Blogger

  ADVERTISEMENTS
Don't want to miss a single bit? Subscribe to our RSS Feed!

With this trick, you can choose to display an arbitrary amount of text from the beginning of each post, as a teaser for the whole thing.

Expandable Post Summaries is the method by which each blog post consists of a short paragraph of introduction followed by a ‘Read More’ link. This enables the reader to get a small introduction to each post on the main page. He can then click the Read More link if he gets sufficiently interested……..

Many bloggers have reported confusion when they tried to follow the instructions on the official blogger help page for this hence I have tried to put the help in more easy to follow terms here. There are basically three steps to follow if you want to implement expandable post summaries in the new layouts template.

CONDITIONAL CSS

The first step is to put the code for the conditional css. This changes how posts display on different pages. To do this login to Dashboard and click on Layout for your blog. Then click on Edit Html and first backup your template by using the Download Full Template link. Then scroll down till you come to </head> tag and add the following code immediately above it :

<style>
<b:if cond=’data:blog.pageType == “item”‘>
span.fullpost {display:inline;}
<b:else/>
span.fullpost {display:none;}
</b:if>
</style>

Save Template. IMPORTANT NOTE in the layouts template there is a ]]></b:skin> tag just above the </head> tag. Add the above code so that it lies between these two tags. What we did here was to define a class called “fullpost” that will appear only on post pages (permalinks).


“READ MORE” LINKS

The second step is to add the Read More links which will appear after the paragraph summaries. To do this put a check in the Expand Widgets Template checkbox at the top of the Edit Template text box. This is in the Edit Html subtab of Template tab. Then scroll down in the code till you come to the Blog Posts Widget code where locate this line of code :

<data:post.body/>

Add the code below immediately after the above code :

<b:if cond=’data:blog.pageType != “item”‘>
<a expr:href=’data:post.url’ target=’_blank’>Read more!</a>
</b:if>

Save Template. This link will only appear on the main page and archive pages, and it will redirect your reader to the post page containing the full text of your post.
IMPORTANT NOTE : Do not use any other code or it will give error.

UPDATE

A Reader wanted to increase the font size of the Read More! link. To do this add this code instead of the one above :

<b:if cond=’data:blog.pageType != “item”‘>
<span ><a expr:href=’data:post.url’ target=’_blank’>Read more!</a></span>
</b:if>

Increase or decrease the figure 120 as you want it and then save the template. To make the font bold use this code instead :

<b:if cond=’data:blog.pageType != “item”‘>
<span style=”font-weight:bold;”><a expr:href=’data:post.url’ target=’_blank’>Read more!</a></span>
</b:if>

Save Template. To do both use this code :

<b:if cond=’data:blog.pageType != “item”‘>
<span style=”font-weight:bold;”><span ><a expr:href=’data:post.url’ target=’_blank’>Read more!</a></span></span>
</b:if>

Save Template.

POST MODIFICATIONS

The last step is to modify the post template so that each post when created will show you where to place your summary paragraph and where to place the rest of the post. To do this go to Settings——>Formatting and scroll down to the end of the page to the box for the Post Template. Copy and Paste the following lines there :

Here is the beginning of my post. <span class=”fullpost”>And here is the rest of it.</span>

Save Settings. When you click on Create Post and then Edit Html tab of Post Editor you will see the following (Click Image for larger view) :


Replace the line “Here is the beginning of my post.” (Type your summary here) with your summary paragraph. Then replace the line “And here is the rest of it.” (Type rest of the post here.) with the rest of your post. Do not delete the other lines <span class=”fullpost”> and </span>. Also add your summary paragraph above both the lines and your rest of the post between the lines. Then click Publish to publish post.

ADVANTAGES OF THIS METHOD

The advantages of this method is you get a link to your posts below your summary paragraph which gets an additional link in the search engines indexing. Also you do not have to rely on any external Javascript. The third advantage is that the Read More link opens into a new page leaving your main page still open in viewer’s browser.
For More Hack CLICK HERE


Tip:- Click Here to Update your Out of Date PC Drivers

If you liked this post: Subscribe by Twitter Follow me on Twitter   or   Subscribe by RSS Subscribe via RSS   or   

Related Articles:


Leave a Comment

12 Responses to “How to create expandable post summaries in Blogger”

  1. Anonymous on March 24th, 2007 3:35 am

    THANK YOU SOOOO MUCH FOR THIS GUIDE. YOUR DIRECTIONS FOR EXPANDABLE POST WERE MUCH BETTER THAN THE ONES BLOGGER PROVIDED

  2. Anonymous on March 25th, 2007 1:04 pm

    Thank you a ton, it was so much helpful… to place the codes at the right place.

  3. faycat on March 27th, 2007 3:09 am

    This was really helpful thank you, so much better than the blogger help guide. One question – what if you don’t want to split up every post? Is there a way to create a post that does not have the “read more” link?

  4. Raj on March 27th, 2007 3:36 am

    Hey Faycat, In that case if yo don,t pant split post and read more option. Thn you hve remove the that span tag form the post when you are righting the post.

  5. Mansi on August 10th, 2007 6:32 pm

    Hi there,

    I understood the code, but in my blogger template, I have the “head” first and then the “b:skin” part!! I inserted the top code u suggested between them, but I don’t see any changes…what am I doing wrong???

    I can’t preview any changes

    -Mansi
    http://funnfud.blogspot.com

  6. Linda Keating on September 10th, 2007 10:19 pm

    Hi The instructions look great and so much better and clearer than blogger – But alas still keep getting the error

    Your template could not be parsed as it is not well-formed. Please make sure all XML elements are closed properly.
    XML error message: Open quote is expected for attribute “{1}” associated with an element type “cond”.

    Any suggestions?

    thanks

  7. Raj on September 10th, 2007 10:33 pm

    Chk the codes again that you added in your blog. You are missing something

  8. Stranger on September 12th, 2007 11:21 am

    I too got this error

    Your template could not be parsed as it is not well-formed. Please make sure all XML elements are closed properly.
    XML error message: Open quote is expected for attribute “{1}” associated with an element type “cond”.

    Plz reply

  9. Raj on September 12th, 2007 11:40 am

    ok do one thing frst parse all your code here and then pate in your template

    http://www.blogcrowds.com/resources/parse_html.php

  10. syntagesmamas on October 21st, 2007 2:24 am

    I had the same error when I copied the code from here. I resolved it by taking the same code from blogger help. But I followed the guidelines provided here, so thank you.

  11. Anthony Taurus on August 9th, 2008 12:01 am

    seems to be a problem. i’ve seen this hack across many sites and i couldn’t figure out why it was working for some of my posts and not for all. the problem that i was getting is that it would cut out the middle of the post, on long posts, and not the entire thing. and yes i placed the end tag at the end. the shorter posts seem to come out just fine.

    i thought, at first, perhaps it had to do with the usage of “span”. maybe the code was closing prematurely. i redefined the element to “hide” but the same problem persisted. then i thought maybe it was the length of the post as it worked on my shorter posts as i tested it out. so when i decided to look at just how much text was being hidden, it terminated at a “blockquote” tag.

    anyway, i was wondering if you could into that because it would suck if i can’t continue to use that quote function.

Trackbacks

  1. Making bloggers posts snippets - Bloggeries Blog Forum