
Redmi 3S is finally available and here in this guide, we’ll show you how to Root Redmi 3S & Install TWRP without losing any data from the phone. This guide will work on both MIUI 7 and MIUI 8 versions. The best part of this guide is you will not lose any data from the Redmi 3S Phone. The guide is pretty simple and all it take a few minutes of Install TWRP Recovery On Redmi 3S and Root Redmi 3S. The Redmi 3S comes with the locked bootloader and to get started first you have to unlock the bootloader of the Redmi 3S and after that follow the below mention steps to get the root access on your phone. Once your phone is rooted you can easily installed Rooted Apps and Custom Roms on your phone.
The guide is only for the Xiaomi Redmi 3S phone users and don’t apply this method on any other Xaiomi phones. Otherwise you will brick your phone. Warning: Tecnobuzz.net is not responsible for any damage that might happen to your phone during this process.
Things you need to Root Redmi 3s
a) Unlock the Bootloader of Redmi 3S first – Click here.
b) TWRP Installer Tool to flash TWRP custom Recovery. Download here.
c) Super Su Zip file to get to Root Redmi 3S – Download Here.
d) Enable USB debugging mode – To do this, Go to Settings >> About Phone >> tap 7 -10 time on the MIUI version. That will activate Developer Options menu. Now go to Settings >> Developer Options then enable USB Debugging.
e) Battery Above 70%.
Redmi 3S – Recommended Accessories
![]()
- Skullcandy Ringer 2XL Bluetooth Speaker
How to Root Redmi 3S & Install TWRP
Step 1. Download the TWRP Installer Tool from the above mention link (Step b) and unzip the folder on your desktop and you will see some files on the folder. See the ScrenShot below.

Step 2. Now boot your phone into Fastboot Mode. To do this, Turn off your phone and Hold Volume Down + Power button.
Step 3. Once your phone in fastboot mode, connect Redmi 3S to PC with USB cable.
Step 4. Now open the TWRP Redmi 3s Folder that you unzipped in Step 1 and run “twrp-installer.bat” and it will show:
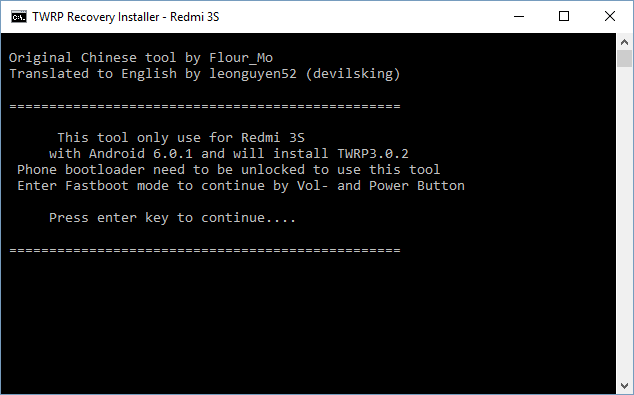
Step 5. Press any key to continue and it will Flash the TWRP recovery on the phone. After it finishes, the phone will automatically boot into recovery mode. At the first time, it will ask for the modifying system or keep it read-only.
– If you choose “Mount system partition read-only”, you will get OTA updates for the Official ROM normally
– If you swipe to allow system modifications, just one more step need to be done after that is go to: Advance setting > Disable dm-verity to let your phone boot normally. Otherwise, it will stuck at Mi logo.
Step 6. Now connect your phone again to the PC and paste SuperSu zip file that you downloaded from Step c on the phone. And remember the location of the Zip file.
Step 7. Now from the recovery, Click on the Install Button and Select the Super Su zip file and flash the same on your phone.
Step 8. Now your phone is rooted. Go back to the Home menu of Recovery and Reboot System.
That’s it. Now the Redmi 3S is rooted, and TWRP custom recovery is successfully installed.
will my data loss if i do this steps ?
Work in 3s prime?
My phone does not reboot automatically.