
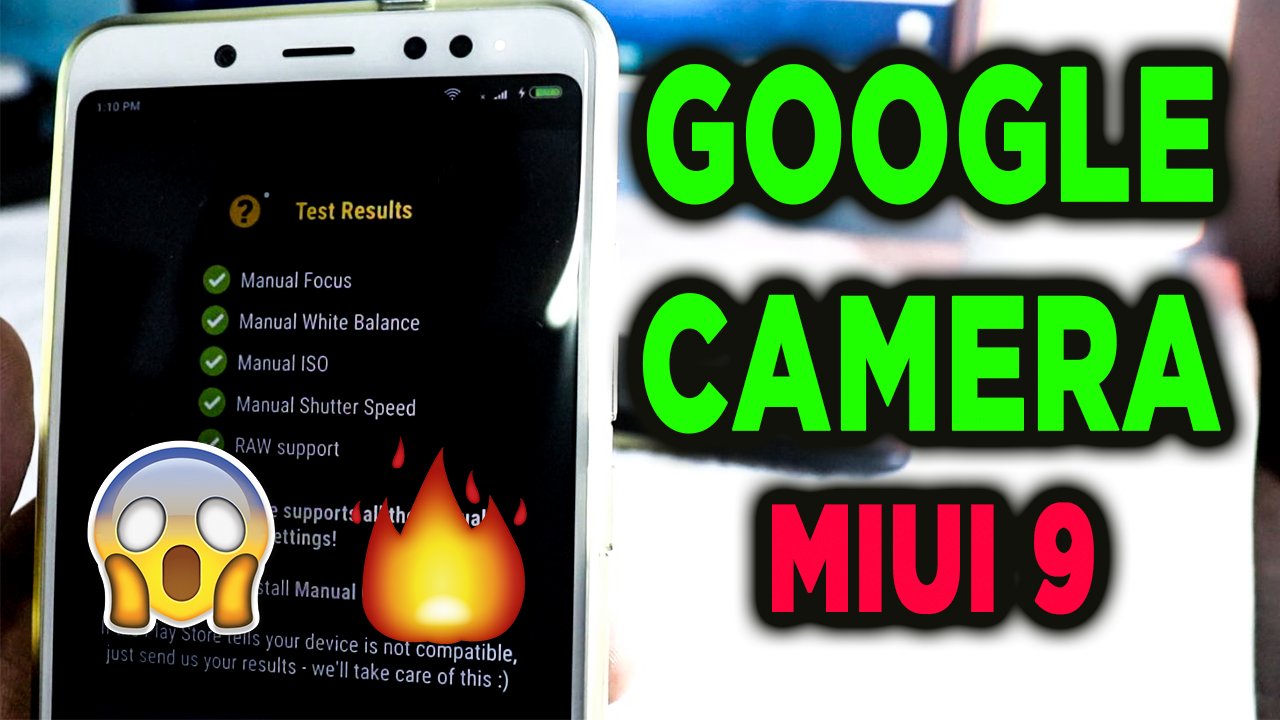
Google camera comes with lots of features and one of the best camera to click the HDR+ & portrait mode. And most of the MIUI Phone users want to install the Google camera on their phone to click some of the best clicks. Here in this tutorial, we will show you how to Download Google Camera for Redmi Note 5 Pro and MIUI 9 Phones. This guide will allow you to install Google Camera on any MIUI phone like Redmi note 5 Pro, Redmi Note5, Redmi Note 4 etc. We tested this method on our Redmi Note Pro which is running on the MIUI 9 Android Nougat. To install the Google camera on your device all you have to enable the Camera2API in Your MIUI Device Without Root. Yes, no need to root the phone and the best part of this guide you will set the OTA updates on your after installing the Google Camera.
By using this tutorial you can enable Camera2api and use Google Camera on your device without rooting your device. All you need a phone with Unlock Bootloader. If you don’t know how to unlock the bootloader on MIUI 9 phone, Check this guide and Unlock bootloader on Xiaomi phones. So let’s get started and download the Google camera on Your MIUI 9 phone. Read Also: How to Enable Camera2API, EIS, and Google Camera On Mi A1 [No-Root]
Download Google Camera For Redmi Note 5 Pro Oy Any MIUI 9 phone
Read this guide very carefully and follow all the steps one by one on your device. In this guide, we are using our Redmi Note 5 Pro to install the Google camera. You can use the same method on your Xiaomi phone which is running on the latest version of MIUI 9.
Warning: Technobuzz.net is not responsible for any damage that might happen to your phone during this process. You’ll lose all your data upon unlocking the bootloader. So take the backup of your Xiaomi Phone.
Download Files to Enable Camera2API in Your MIUI Device Without Root
- Download SDK Platform-Tools for Windows here to run fastboot commands.
- Download TWRP file for Redmi Note 5 Pro here
- Download TWRP for Other MIUI 9 Phones.
- Download Root checker app on your phone.
- Download Google Camera apk file here and save the4 apk file on your phone.
How to Install Google Camera and Enable Camera2API
1. Unzip the SDK Platform-Tools for Windows on your desktop and paste TWRP image file (twrp.img) on the folder.

2. Now on your phone, Go to Settings – About Phone – Tap 7 consecutive times on MIUI Version to enable developer options, and go to Settings – Additional Settings – Developer options and enable USB debugging option.
3. Now connect your phone to the PC with USB cable and Allow USB debugging on popup window on your phone.

4. Open the folder of Platform-Tools in your PC, hold the shift key on your PC keyboard and right your mouse on the empty space in the folder and select “Open command window here”.

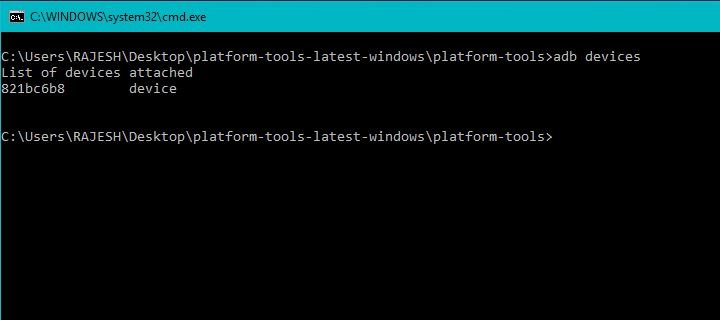
5. Now enter the following command in the command window to check the connection between phone and PC. Which will show the serial number of your device and status of the connection.
adb devices
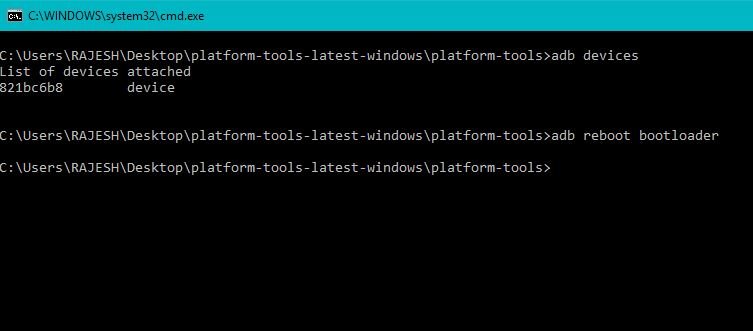
6. Now to boot your phone in fastboot mode. Enter the following mode.
adb reboot bootloader
7. Now your phone in fastboot mode. To boot the TWRP on the phone. Run the following command.
fastboot boot twrp.img

8. Now your phone will boot in the TWRP mode. On the TWRP screen, Tap on the “Keep Read Only” and leave the phone as it is.
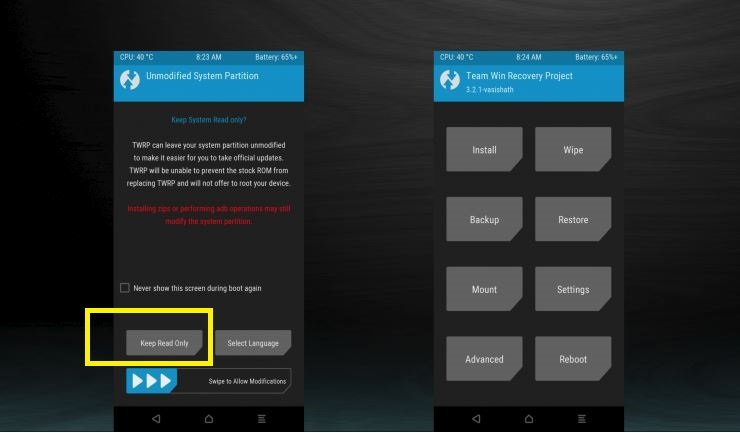
(We don’t need to do anything from the recovery, keep the device connected to PC and rest it aside)
9. Now go back to the command prompt windows and enter the following commands to check the connection of device with PC.
adb devices

It will show your device serial number and recovery as status.
10. Now we need to edit the build prop to add a line which enables Camera2API on the phone. Enter the following command.
adb shell
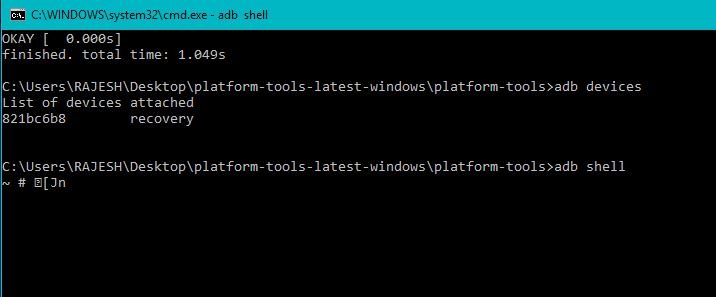
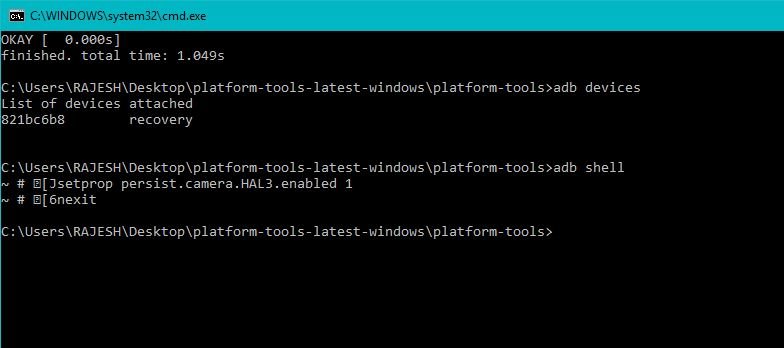
11. Once the adb shell opens up you need to add a line for enabling Camera2api, copy paste the below command and hit enter.
setprop persist.camera.HAL3.enabled 1

12. Now type exit command to exit the adb shell.
exit
13. Now you need to reboot the device, you can do that from the recovery or just by using the following command.
adb reboot
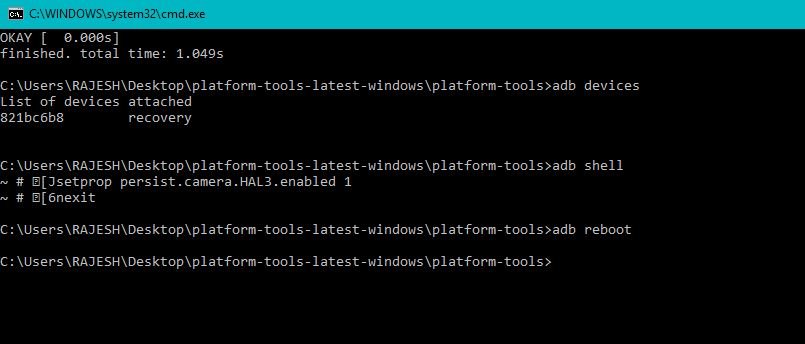
14. That’s it. Now your phone will boot and once your device boots up it will have Camera2api enabled and the TWRP which we booted above will be removed.
15. Now install the Google camera on your phone. And the google camera will work fine on your phone.
16. Now run the Root Checker app on your phone. And verify root. Your phone is non-rooted and you will get the OTA system update on your phone.
In future, if you want to disable Camera2api change the step 11 command to “setprop persist.camera.HAL3.enabled 0” and follow all the process said above.
Video – Google Camera on Redmi Note 5 Pro and ANY MIUI 9 Phone [No ROOT]
.
Direct Link to YouTube Video
Hope this helps the MI users who don’t want to root but want to use the Google Camera Mods on their phones. If you are facing some problem with this guide then leave the comment below and we will help you to fix it up.
Does this work with the global version of the xiaomi redmi note 5?
I have tried a lot of ways to unlock the bootloader but all seems to be made for the indian version of the note 5 (the redmi note 5 pro)
Bro which google you use full name please i am trying many google but google camera automatically kill
Try this – https://www.celsoazevedo.com/files/android/google-camera/f/MGC_5.2.022_FINAL_1.0.apk
Sir after the twrp reboot my computer is not showing the device what to do???
Sir not working. I am in 9.5.13. redmi note 5 pro. After full process successfully done when i check by manual camera comparability all are red.
I followed each command exactly the same way you did in your video but, camera2api has not been enabled in my Redmi 5. I am not getting any error.It asks for a password on the launch of twrp screen. I entered my lock screen password but it says failed then, i cancel the password screen and twrp screen opens normally.
I am using the Right twrp file and bootloader is also unlocked. please write a solution.
My phone :
Redmi note 5 China
MIUI 9
Android version Oreo
I follow the step and get failed when tried to boot twrp.img, and found notif on my Phone “the system has been destroyed..”
Rohan tive este problemas sofri, mas a solução é bem simples. Basta ir em mount e ativar a opção do menu em baixo ‘enable mtp’ algo parecido com isso.
not working on miui 10.0.1.0 on note 5 pro indian
This is awesome. Very clear and concise guide. Thanks mate!