
If you are the proud owner of Google Nexus 5 smartphone and looking for the guide to Install Nexus 5 Driver (ADB and Fastboot) and Unlock Bootloader. Today in this guide, we will show how you will do that on your PC without any problem. The guide is little bit lengthy, but not so hard. All you have to install some files and run some commands on your windows system and on your phone to complete the installation process. Most of the new android phone users don’t know how to install these ADB and Fastboot drivers and unlock the bootloader. Once the drivers are installed and bootloader is unlocked, you will root your nexus 5, Install custom roms and install custom recovery.
Warning: Warranty may be void of your device if you follow the procedures given on this page. Read all the instruction very carefully and We won’t be liable if any damage occurs to your device. You only are responsible for your device.
NOTE- Download & Install Android 5.0 LolliPop on Nexus 5, Nexus7, 10
Read Also: Guide to Flash Factory Images / Stock on Any Nexus Device
Read Also:- How to Install Moto X, Moto G & Moto E USB Drivers (Windows & MAC)
Read Also:- Install Android 6.0 Marshmallow on Nexus 5, Nexus 6, Nexus 9, Nexus 7 2013
Read Also:- Download & Install LG Nexus 5X USB drivers + ADB Fastboot
Read Also:- How to Install Huawei Google Nexus 6P USB Drivers on Windows
Nexus 5 Driver Installation Guide
First enable USB Debugging mode on your phone, to do this go to Settings > About phone > Tap on Build number 7 times. This will enable Developer options. Now go back to Settings > Developer options > Enable USB debugging.
Step 1. Download the latest Google USB Driver here [Mirror Link] and extract the folder on your desktop.
Step 2. Now Connect your Nexus 5 to your PC with USB cable.
Step 3. Open the Device Manager on your desktop (To do this Search for Device Manager from Start screen and click to open.
Step 4. Once the Device manager is on your screen you will see the Nexus 5 on the Other Device list option with a yellow exclamation mark. Right Click on the Nexus 5 and select Update Driver Software.

Step 5. Now from the next screen click on the Browse my computer for driver software

Step 6. From the next windows click on the Browse button and select the Google USB Driver folder that you downloaded on the Step 1. And keep the Include subfolders box checked. See the Screenshot below:-
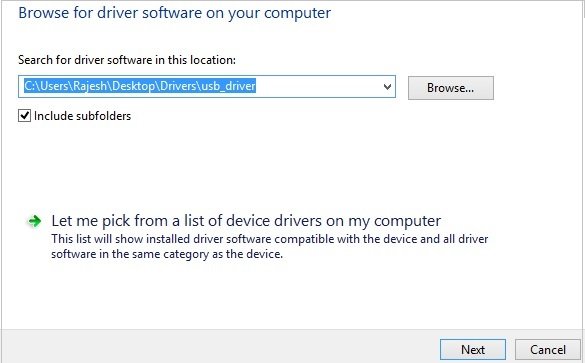
Step 6. Now hit the Next button to start the drivers installation and at the time of installation Windows may ask your permission to install the drivers published by Google Inc. Click Install
Step 7. Once the installation is finished on your PC, go to the Device manager and confirm. Here your Nexus 5 should be listed as ‘Android Composite ADB Interface’.

Installing Fastboot Drivers for Nexus 5
Step 1. Enable USB Debugging Mode.
Step 2. Switch off your phone and boot it in bootloader/fastboot mode. To do this Hold Volume Up Key + Volume Down Key and then press the Power button.
Step 3. Connect your phone to the computer, Now PC will automatically recognise and install the right drivers for fastboot.
Guide to Unlock Nexus 5 Bootloader
Now the Nexus 5 Driver are installed on your PC, so let’s get started to unlock the bootloader.
Step 1. First take the backup of your android phone.
Step 2. Download the Nexus 5 Unlock Bootloader files here and extract the folder on your desktop.
Step 3. Switch off your phone and boot it in bootloader/fastboot mode. To do this Hold Volume Up Key + Volume Down Key and then press the Power button.
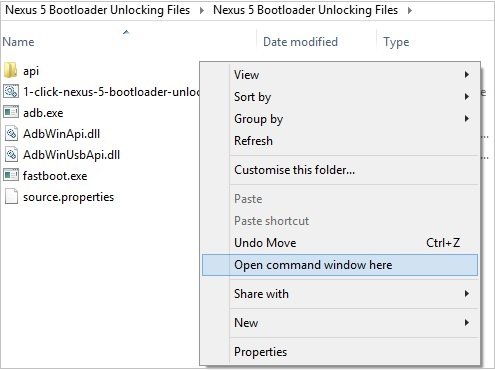
Step 4. Now open the Nexus 5 Unlock Bootloader folder on your desktop and Press Shift key + Right click on any empty space inside the folder, and select Open command window here.
Step 5. Connect your phone to the computer, and type fastboot devices in the command prompt window.
This command will list the connected devices. If your phones serial number is not listed on the windows, it means your drivers are not installed correctly. reinstall the drivers again or Change the USB port.
Step 6. If the phone has been recognized by the command above, proceed to unlocking the bootloader with the following command:
fastboot oem unlock
Step 7. Now on the Nexus 5 screen you will see the message to unlock bottloader or not. Use the volume rockers to highlight “Yes” then press power to confirm the action.
That’s all. Now your nexus 5 bootloader is unlocked.
How come the device manager shows Google nexus 5 adb interface instead of composite adb interface? And why does it show Google nexus 4 boot loader when my phone is nexus 5?