
Zenfone Max Pro is the latest Android smartphone from the ASUS and phone are already available in the Indian market and selling like the hotcakes. Many Android Fans already pre-booked the phone and some of them already got the devices. The new phone comes with Dual 13 megapixel rear and 16 megapixels front Camera, large 5000 mAh battery and runs on the Android 8.1 Oreo. And most of the Asus ZenFone Max Pro M1 users want to root the phone and install custom ROM on their phone. So here in this guide, we will show you how to Root Asus ZenFone Max Pro M1 and Install TWRP recovery.
To root any android phone first you need to unlock the bootloader of the phone, here is the complete guide which you can follow on your phone and unlock the bootloader of Asus ZenFone Max Pro M1. Once the bootloader of the phone is unlocked. You have to flash the TWRP Custom recovery with the help of fastboot commands and after that flash the Magisk Zip file to gain the root access on the device. So without wasting your time lets root the Asus ZenFone Max Pro M1.

How to Root Asus ZenFone Max Pro M1 and Install TWRP Recovery
Warning: Technobuzz.net is not responsible for any damage that might happen to your phone during this process. You’ll lose all your data upon unlocking bootloader.
The rooting process is not that easy. so read all the steps very carefully and follow all of them one by one. One wrong step and you will brick the phone. And yes this process will take some time, so relax and read the rooting guide carefully.
Benefits of Rooting
With the help of rooting you will do lots of things on your device like Install Custom Roms, improves the battery performance of your device, remove unwanted system applications, install tweaks and other modification on your device easily and enjoy a lot of free rooted application on your device.
In simple word, we can say rooting gives you the administrator-level permissions on your device and customize your device as per your need which is impossible for a normal android. Check out some other benefits of Rooting the Android phone.
Pre-requirements To Root Android phone
- Make Sure bootloader is Unlocked of your Asus phone.
- Make sure that the battery of your Phone is above 70%.
- Follow all steps correctly otherwise, you will end up with a bricked phone.
- Do take the full backup of Asus phone.
Download File To Root Asus ZenFone Max Pro
- Download the TWRP image here and save the file on your desktop.
- Install the ADB drivers here and you will see the ADB folder on your Windows C Drive (C:/ADB)
- Download the Magisk manager zip here to root the phone.
Install TWRP on Asus ZenFone Max Pro M1
1. First of all, enable the Developer Option. To do this go to your Settings -> About -> Software Information -> More -> Now Tap on the Build Number 7-8 Times until you see a toast message “Developer option enabled”.
2. Now go back to settings -> Enable the OEM Unlock by going to Settings -> Developer Option and Enable OEM Unlock and USB Debugging. See the screen shot below.

3. Now open the ADB folder on your desktop and paste the TWRP recovery file in the folder.
4. Now Reboot your phone to fastboot mode by pressing volume up + power on at the same time.
5. Connect your phone to the Windows PC with the USB cable.
6. Now open the command prompt window in the ADB folder by Pressing Shift Button and Select Open Command Window Here.
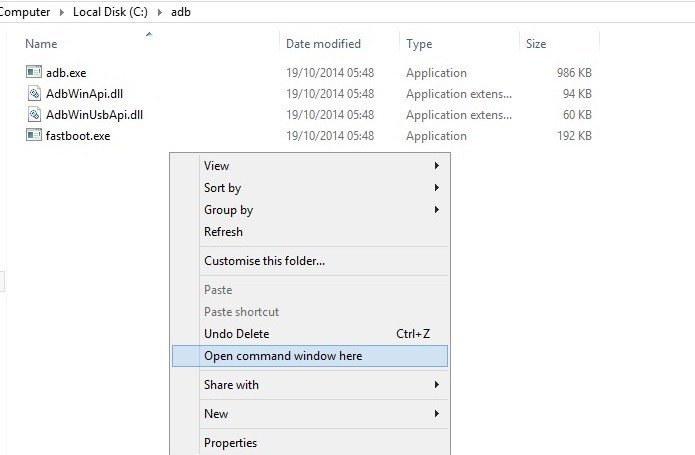
7. Now the command prompt windows will open on your windows desktop.
8. Now enter the following command to check the connection between PC and USB.
fastboot devices

9. Now Use this command for Flash TWRP recovery.
fastboot flash recovery recovery.img
This will flash the TWRP on your phone.

10. Once the TWRP is flashed. Reboot your phone.
fastboot reboot
That’s it, You have successfully installed TWRP recovery in Zenfone Max Pro.
Steps to Root the Asus ZenFone Max Pro M1
1. Save the magisk manager zip file on your phone’s internal memory.
2. Now boot your phone in TWRP recovery mode. To do this first turn off your phone. Now Hold Volume Down + Power button together.
3. Once your phone booted in TWRP mode. Tap on the Install option to flash the magisk root file.
4. Select the magisk manager zip file and Swipe the button to confirm the installation process.
5. That’s it… You have successfully root Zenfone Max Pro without PC. Now tap reboot system.
So with this way, you easily Root Asus ZenFone Max Pro M1 and Install TWRP Recovery. If you are facing some trouble with this guide them leave the comments below and we will help you to fix it up.
thanks for sharing this types of article I like your blog keep up it bro
After installing TWRP, i am trying to reboot the phone into TWRP recovery but it just shows FASTBOOT MODE. There is no other option whatsoever. And when i boot my phone in normal recovery mode of android i don’t see any option too install magisk as you have described. Please help.
Try this command fastboot boot recovery.img
from where can I get stock recovery for asus zenfone max pro m1
How to flash fastboot ROM in Asus Zenfone max pro M1?
Don’t try fastboot boot recovery.img
It will flash recovery in boot partician, you will end up hard bricking device.
What if my phone gets bricked or get stuck in boot loops?
Boot loader is unlocked in my phone, but not showing oem in my phone