
LG Nexus 5X the latest smartphone from Google is launched and most of the users already bought the phone and enjoying the new phone with Android 6.0 Marshmallow OS. The Nexus 5X comes with lots of new feature and first phone which run on the latest Android OS marshmallow. Now the good new is that you can root the device and install the TWRP custom recovery on your phone. Once the phone is rooted with a custom recovery you can enjoy lots of tweaks, rooted application and custom ROM on your phone, check out some of the benefits of rooting here. To root the Nexus 5X phone first you have to unlock the bootloader, then install the TWRP and Super SU zip file to get the root access. Our below mention guide covers the A to Z of this, and even if you are new and don’t know how to do this on your phone , this guide will help you how to do all steps in an easy way.
Let’s see how to root Nexus 5X by LG and Google. Before do that do take the full backup of your phone and save it in some place. Read here how to backup android phone. Read all the steps very carefully and follow all of them step by step on your Nexus 5X. This guide is only for the build no mdb08i as of now. Do not flash on any other build!
Root LG Nexus 5X and Install TWRP
[wpsm_ads1]
.
Step 1. First you have to install the Nexus 5X USB drivers here.
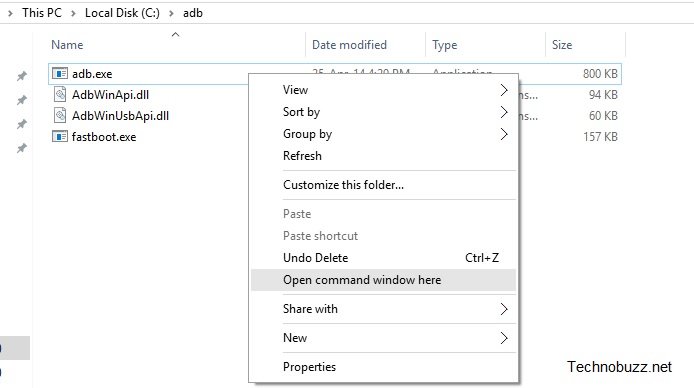
Step 2. Now install the ADB and Fast boot files here and this will create an ADB folder on your Windows C Drive (C:/ADB)
Step 3. To unlock bootloader, you have to Enable OEM Unlock and USB Debugging on your Nexus 5X (If you already unlock the bootloader of you phone and then go to the Step 7). Go to Settings > About device. Locate build no. and tap on it 7-8 times or until you get toast notification saying you’re now a developer’.
Go back to Settings, and scroll down and open ‘Developer options’. Here enable the “USB debugging” mode and “Enable OEM Unlock”.
Step 4. Boot your device into bootloader mode. To do this Power off the device and press and hold Volume Down + Power button together until you see FASTBOOT written at the top. This is fastboot/bootloader mode.
Step 5. Open the ADB folder that you created in Step 2. Left click on empty white space in the folder and while holding the shift key, right click on empty white space, select the “Open command window here” option.
Step 6. Connect your phone to the PC with USB cable and Run the command given below to check your phone is connected or not
fastboot devices
You should get a serial number on the window. This means you phone is connected successfully. Now enter the following command to unlock bootloader:-
fastboot oem unlock
Confirm bootloader unlock now on your Nexus 5X phone screen Press Volume UP button to accept and confirm. This will delete all you data on the phone.
Now your phone will reboot and first boot will take some time.
Step 7. To install TWRP and Root phone, download the below mention files:-
- Download modified boot image — Link | Download Mirror | File: bullhead-mdb08i-boot.zip (9.98 MB)
Unzip the folder to get boot.img file.
- Download TWRP recovery — Link | File: twrp-2.8.7.0-bullhead.img (15.9MB)
- Download SuperSU root package — Link | File: BETA-SuperSU-v2.52.zip (3.8 MB)
Step 8. Now move the first two file boot image and TWRP recovery in the ADB folder that you created in Step 2. And Rename the TWRP recovery file to twrp.img
And move the Super SU zip file on your Nexus 5X internal memory.
Step 9. Open the ADB folder that you created in Step 2. Left click on empty white space in the folder and while holding the shift key, right click on empty white space, select the “Open command window here” option.
Step 10. Connect your phone to the PC with USB cable and Run the command given below to check your phone is connected or not
fastboot devices
You should get a serial number on the window. This means you phone is connected successfully.
Step 11. Flash modified boot image now. Use the following command for that.
fastboot flash boot boot.img
Step 12. Now flash the TWRP with this command:-
fastboot flash recovery twrp.img
Step 13. Now TWRP is installed on your phone. To boot in TWRP mode use this command.
fastboot boot twrp.img
Step 14. Now you will see the TWRP screen on your phone.
Step 15. Select allow modifications on TWRP and Go to Wipe & select format data.
Step 16. After that is done, reboot into system without rooting& skip through setup again. Now if you check the encryption status of your phone (Settings -> Security – Encrypt phone), it won’t be encrypted anymore as it’ll give you the option of encrypting it, which means it currently isn’t encrypted.
Step 17. To root the phone you have flash the Super Su zip file on your phone. The same file that you saved on your phone in Step 8. Reboot into TWRP
Step 18. In TWRP, tap on Install, and then select the SuperSU file. Next, do the swipe action at the bottom of the screen to flash the SuperSU file.
Step 19. Once you’ve installed SuperSU you’ll have the option to wipe cache/Dalvik and an option to reboot system. Wipe the cache/dalvik, hit the back button, and hit the reboot system button.
That’s it. Now your Nexus 5X is rooted with TWRP recovery.
In step 17, you have people install SuperSU – which is correct. SuperSU is now installed! Step 18 is wrong. It is correct to push ‘do not install’ – that is NOT flash TWRP’s version of SuperSU. In fact, there is a message onscreen in TWRP saying to NOT install twrp’s version. After flashing in step 17, push back button. Wipe dalvik/cache. Then back to twrp menu…. reboot. DO NOT FLASH ANYTHING ELSE!!! You’re done flashing SuperSU in step 17.