
Xiaomi Redmi Note 5 and Redmi Note 5 Pro is officially announced in the Indian market. So today in this post we will discuss how to root Root Redmi Note 5 / Note 5 Pro and Install TWRP Recovery. With the help of this guide, you can quickly Root Redmi Note 5 / Note 5 Pro with the help of the TWRP custom Recovery. In this, we are showing you the two methods to Root Redmi Note 5 / Note 5 Pro with magisk Manager and SuperSu rooting tools. The whole guide is a little bit of lengthy but one of the best way to root your new Root Redmi Note 5 / Note 5 Pro.
Once you can successfully root your phone, you can enjoy lots of custom ROMs on your phone, Enjoy Tweaks and other rooted apps on your phone. This guide is only for the Redmi Note 5 / Note 5 Pro users who want to get the root access on their phones. Don’t follow this method on any other phone otherwise; you will brick your phone. So let’s get started and Root Redmi Note 5 / Note 5 Pro.

Working Guide to Root Redmi Note 5 / Note 5 Pro
Before following the below mention guide make sure that your phone has enough battery and do take the full backup of your phone. This process will wipe your data so save all your files and data in some safe place.
Read all the instructions very carefully and follow all of them one by one on your phone.
Benefits of Root Redmi Note 5 / Note 5 Pro
- Install Custom ROM on your phone.
- Take the nandroid backup of your phone.
- Install Xposed Modules on your phone and tweak your phone.
- Install lots of Rooted apps on your phone and customize your phone as per your need.
- Install lots of Mods like Google Cam with the portrait mode.
- You will able to flash ROMs and zip files.
Pre-requirements To Root Redmi Note 5 / Note 5 Pro
- Unlock the Bootloader of your Phone with Mi Unlock Tool.
- Do take the full backup of your phone.
- Make sure there is more than 75% Charge on your Android Phone.
- USB cable to connect your phone to the PC to flash some files on your phone with ADB commands.
Download Files to Root The Xiaomi Redmi Note 5 / Note 5
- Download TWRP Recovery for Redmi Note 5 here.
- Download TWRP Recovery for Redmi Note 5 Pro here
- Download Magisk Manager to Root Redmi Note 5 / Note 5 Pro here.
- Download SuperSu to Root Redmi Note 5 / Note 5 Pro here.
- Download ADB and Fastboot drivers for windows here.
Save all the files on your desktop and follow the next method to install the TWRP Custom Recovery on your phone.
Guide to install the TWRP recovery on Root Redmi Note 5 / Note 5 Pro
1. First, you need to unlock the bootloader of your phone. Check the about mention link in Pre-requirements section to unlock Root Redmi Note 5 / Note 5 Pro.
2. Now Unzip the ADB folder on your phone and install the same on your Windows PC. Now you will find the ADB folder on your Windows C Drive (C:/ADB)
3. Enable the USB debugging on your phone. Go to Phone Settings > About Phone > Now Tap on Build Number 7 time until you see a message on the screen like ” You Are Now A Developer”.
4. Now you have developer option, so go to Settings-> Developer Options -> Enable USB debugging and also enable OEM to unlock.
5. Now unzip the TWRP folder on your phone and rename the TWRP .img file to recovery.img
6. Save the recovery.img in the ADB folder that you created in Step 2 while installing ADB drivers.
7. Now time to Reboot your Redmi Note 5 / Note 5 Pro in fastboot mode. To do this first turn it off and Hold the Volume Down + Power button to boot into fastboot mode.
8. Once your phone in fastboot mode, connect it to the PC with USB cable.
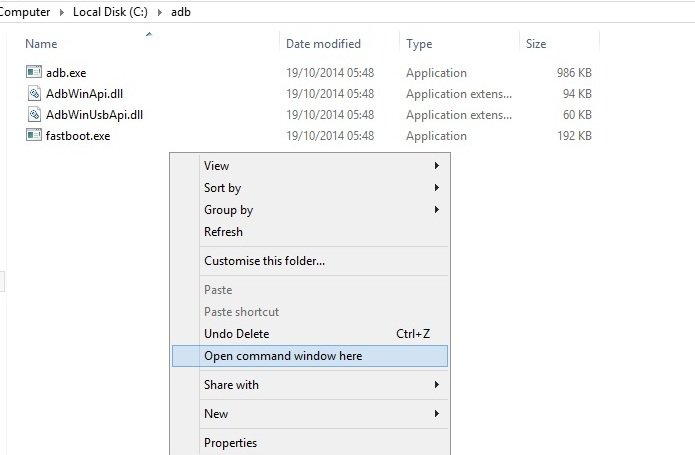
8. Open the ADB folder and open the command prompt window in the ADB folder by Pressing Left Shift + Right Click and Select Open Command Window Here.
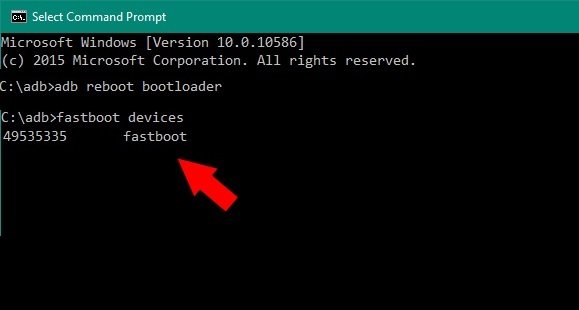
9. Now in the command prompt window enter the following command to check the connection between the phone and Windows PC.
fastboot devices
10. Now time to install the TWRP on the phone.
fastboot flash recovery recovery.img

11. Now the TWRP recovery is successfully installed on your phone. Enter the following command to reboot your phone.
fastboot reboot
Now time to root Redmi Note 5 / Note 5 Pro
Root Redmi Note 5 / Note 5 Pro With Magisk Manager
1. Download the Magisk Manager zip file from the download section and save the zip file on your phones internal memory.
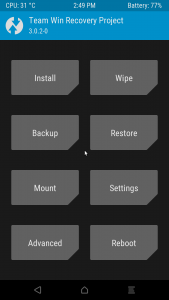
2. Now boot your phone in TWRP recovery mode. To boot in custom recovery mode first turn off your phone and hold volume up + power key together.
3. Once your phone in TWRP mode. Tap on the install option. Find the Rooting Magisk zip and install it on your smartphone.
4. Swipe the button to confirm the installation process.
5. That’s it… You have successfully rooted Xiaomi Redmi Note 5 / Note 5 Pro. Now tap reboot system.
Root Redmi Note 5 / Note 5 Pro With SuperSu
1. Download the SuperSu zip file from the download section and save the zip file on your phones internal memory.
2. Now boot your phone in TWRP recovery mode. To boot in custom recovery mode first turn off your phone and hold volume up + power key together.
3. Once your phone in TWRP mode. Tap on the install option. Find the Rooting SuperSu zip and install it on your smartphone.
4. Swipe the button to confirm the installation process.
5. That’s it… You have successfully rooted Xiaomi Redmi Note 5 / Note 5 Pro. Now tap reboot system.
Video Guide to Root Redmi Note 5 Pro
Direct Link to YouTube Video
So this is the quickest method to root the Redmi Note 5 / Note 5 Pro. If you have any question regarding this guide or facing some problem, then leave the comment below, and we will help you to fix it up.
Thank you for information. I will try on Redmi Note 5
Thanks for video helped me to root and install twrp
Mere paas MIUI 10 UPDATE NAHI HO RAHA 8.8.9 OR 8.5.31 dono kare par nahi hua
Will it void the warranty?
can u help to root my device redminote 5
I have flashed the TWRP and install the magsik manager. But on rebooting the phone my camera2api gets disable. Moreover even with the camera2api enabled I cannot successfully run a gcam app that works with front and back camera.After reading this article, I have check that and my anti rollback feature is at index 4. I already have TWRP in my Phone what should I do to permanently enable camera2api or disable the antiroll back feature while TWRP is already on the phone. also can you please recommend a gcam version of app that run without any issue.
NOTE: I have followed one your guide to root the device.