
Few days back Google released the Android 5.1.1 Lollipop update (LMY47X) for the Nexus 9 (Wi-Fi), now google released the android 5.1.1 Lollipop factory images for LG Nexus 4, LG Nexus 5, and the LTE variant of HTC Nexus 9. If you own any of these devices, you should be able to download the 5.1.1 via the OTA method. As we all know that OTA rollout take some time, but in this guide we’ll show you how you can install this update on your phone manually and enjoy the latest version of Android 5.1.1 Lollipop. All you have to do is download the factory image from the google server and flash it with the help of ADB commands.
Here in this guide we’ll show you the step by step instructions to update Nexus 4, 5, & Nexus 9 (LTE) with official android 5.1.1 lollipop. This method will work for all users who have the nexus with stock rom, rooted phone or running on the Custom ROM.

Update Nexus 4, 5, & Nexus 9 with Android 5.1.1
To get started you have to unlock the bootloader of your phone, read here how to unlock Nexus bootloader. If you already done that then follow the below mention instructions.
Step 1. Download the latest ADB Files here on your desktop and extract the folder.
Step 2. Now download the Nexus 4, 5, & Nexus 9 (LTE) Android 5.1.1 from the below mention links.
Nexus 4 5.1.1 (LMY47V)
Nexus 5 5.1.1 (LMY48B)
Nexus 9 (LTE) 5.1.1 (LMY47X)
Once the .tgz file is downloaded on your desktop, extract folder with the help of Winrar or Winzip.
Step 3. Now copy all the file and paste them to the ADB folder that you created on the step 1.
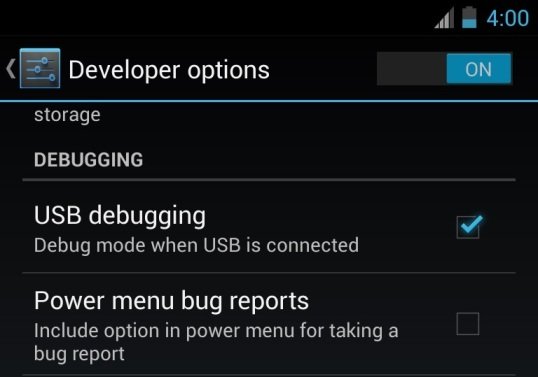
Step 4. Enable the USB Debugging mode on your device, Go to the Settings » select About device » Scroll to the bottom and tap on “Build number” seven times to enable developer options. Now the developer option is visible on your phone settings. To Enable USB Debugging again go to Settings » select Developer options » Tick the “USB debugging” checkbox (under Debugging section).
Step 5. Connect your device to your computer over USB.
Step 6. Now boot your phone in fastboot mode, to do this switch off your nexus and Turn ON the phone while pressing and holding the Volume Up + Volume Down + Power buttons till you see the Fastboot menu and START on top.
Step 7.Once your device in fastboot mode. Open the ADB folder in which you pasted the nexus files and do the following depending which OS you are on:
On Windows: Run the file “flash-all.bat”.
On Mac: Run the file “flash-all.sh” using Terminal.
On Linux: Run the file “flash-all.sh”.
Step 8. Now flashing process will start on your device. Once completed the phone will boot and it might take about 5 minutes to boot on your first time. So, please wait with patience!
That’s it! Your Nexus is running on the latest Android 5.1.1 LMY48B Lollipop